Info Ter-Update Seputar Game Mobile (Android & iOS)

Minggu, 30 September 2012

(APP) VidTrim Video Editor Pro


Trim videos, grab frames, compress your videos and share all on your phone !


VidTrim Pro - Video Editor v2.0.11 play.google.com.VidTrimPro
Trim videos, grab frames, compress your videos and share all on your phone.
VidTrim Pro is a video editor and organizer for Android. It includes multiple features like trimming, frame grabbing and transcoding. You can also share your videos with your friends directly through the app.

Features :
  • Video trimmer. Trim video clips right on your device
  • Trim original clip (overwrite)
  • Save as a new clip
  • Play video clips
  • Share video clips. (Send e-mail, upload to YouTube etc.)
  • Rename video clips
  • Delete video clips
Features exclusive to VidTrim Pro:
  • No ads
  • Frame grabber. Extract/save frames from your video clips as images.
  •  Transcode (resize and compress) video clips to smaller sizes.
What's in this version : (Updated : Jul 3, 2012)
  • Fix force close on Preferences screen
Required Android O/S : 2.1+

Screenshots :
 

Trik Mengatasi Masalah "There is insufficient space on the device" di Android


Salah satu penyakit dari Android Market versi terbaru adalah munculnya pesan There is insufficient space on the device saat menginstall atau mengupdate aplikasi. Padahal jika ditilik, memory yang tersedia padadroid devices milik kita sangatlah mencukupi. Hal itu terjadi –selain akibat dari bug aplikasi Market–  karena keterbatasan partisi cacheyang disediakan. Cara mengatasinya adalah dengan memindahkan partisi cache ke internal SD yang dimiliki.
Berikut adalah cara yang paling mudah untuk melakukan hal tersebut.Kebutuhan:
  1. Android devices yang sudah di root (Baca tutorial rooting disini)
  2. Menginstall aplikasi Script Manager yang bisa didapat dari market.
  3. Donwload shell script movingcache.sh disini
Langkah-langkah:

Sabtu, 29 September 2012

Tutorial Rooting Sony Xperia Tipo


xperia-tipo-message-madetomatchyourmoods-460x250

SONY Xperia TIPO smartphone can now be rooted and also the boot loadercan be unlocked. So, for all those devices who have managed to unlock the boot loader, we will be discussing on a detailed tutorial which will help you in rooting the device. In the next coming days we will be coming up with a host of custom ROM firmwares which will help you to make the most of your smartphone. Once the device is rooted, you can install many custom ROM firmwares which also includes the likes of latest jellybean 4.1.1. Unfortunately, there is no ETA as of now on by when there will be an Official release of Jellybean.
Disclaimer: Follow all the instructions mentioned in this article so as to make sure that the update is applied successfully. We should not be held responsible or liable for any damage happened to your phone caused due to not following of instructions.
Though it’s not a compulsion but it’s recommended to back up the data with the help of below steps so as to make sure that just in case if the data gets corrupted or erased, the same can be restored with the help of below steps. Alternatively, you can also create a backup using the PC Companion tool.
SMS – Use “SMS Backup & Restore app”,
Contacts – Sync with the Gmail application,
Call Log - Call Log and Restore
Images, Songs, Videos, Files – Copy to internal / External SD Card,
APN and MMS Settings – Note down from the path “Applications > Settings > Wireless and Network > Mobile Networks > Access Point Names
Minimum battery should be more than 30% and also ensure that all the antivirus / firewall tools in yourcomputer are turned off as these tools generally tend to interrupt the process of rooting. Ensure that your computer has active COM Ports.

Procedure to Root SONY Xperia TIPO Android Smart phone:

Jumat, 28 September 2012

Upgrade Firmware+Rooting Axioo Vigo 350


Bahan baku yang harus dibutuhkan : 
Aplikasi SUTLR 1.7  
Firmware ViewPhone 3e V350TViewsonic
PC / Laptop OS Windows XP.
Handset Axioo Vigo 350 

Untuk PC / Laptop dengan OS Windows Vista atau Seven dapat menggunakan Aplikasi SUTLR 1.8.2
(Terima Kasih buat mulialim yang memberi tambahan informasi)

Langkah langkah :
  

Selasa, 25 September 2012

Tutorial Rooting Sony Live With Walkman Tanpa Unlock Bootloader


Saya mau share cara rooting xperia live walkman tanpa perlu unlock bootloader terlebih dahulu. 

Buat Pemilik HP Android yang ingin mencoba menjadi superuser dapat dilakukan dengan cara me root.

Dengan memiliki akses root atau superuser banyak hal yg bisa dilakukan seperti :
  1. memindahkan aplikasi yg terinstall pada memory phone ke memory eksternal
  2. melakukan backup semua aplikasi ke memory eksternal
  3. mengaktifkan swap / virtual memory
  4. menginstall aplikasi yg membutuhkan akses superuser/root
  5. dll

Download bahan-bahannya disini :

Extract file usb driver di atas, colokin kabel usb ke lww nanti muncul install driver, next tar pilih yg advance, lalu cari folder yg tadi next-next finish jalanin runme.bat 
done..

Note : harusnya sih kalo udah install pc companion otomatis terinstall jg usb drivernya

Langkah-langkah root:

1. Install dlu pc companion dan usb driver di komputer atau laptop
2. Colokin HH kk dengan komputer atau laptopnya, lalu ceklis usb debugging yg ada di setting --> application --> development dan --> enable unknown source yg ada di setting-application

3. Ekstrak file root.zip yg sudah di download di atas, kemudian jalankan file "wt19i.exe" , ikutin aja video di bawah :


Trik Menstabilkan Koneksi Wfi & 2G/3G/HSPA dengan App Network Signal Speed Booster


Pusing dengan kondisi sinyal di daerah anda yang lemah dan tidak stabil ? Segala aktifitas anda di dunia maya akan sangat terganggu karenanya, sekalipun misalkan anda menggunakan gadget tercanggih dan terbaru. Kekuatan dan stabilitas sinyal adalah hal utama yang paling mempengaruhi kecepatan dan akses anda ke dunia internet, apapun gadget yang anda gunakan, jika sinyalnya lemah dan tidak stabil maka berantakanlah semuanya.
Network Signal Speed Booster ss 2
Untuk itu aplikasi Network Signal Booster hadir. Apapun jenis koneksi yang anda gunakan, WiFi, 3G atau bahkan EDGE, aplikasi ini akan mem-boost koneksi agar lebih kuat dan stabil. Developer yang membuat aplikasi ini, Sounds Inc. menyebutkan bahwa mekanisme kerja aplikasi ini sangat sederhana namun efektif, yaitu men-drop koneksi yang tidak stabil/lemah dan mencoba menyambungkan pada koneksi yang lebih baik. Yakni dengan cara mencari koneksi router WiFi terdekat, ataupun gelombang dari tower selular yang lebih kuat.

Blokir Situs Porno dengan Aplikasi Set DNS


Sobat @DroidUNJ, tidak dapat dipungkiri situs dewasa dapat dibuka secara bebas melalui browser yang ada pada HH ponsel atau smartphone Android. Tentu saja itu akan sangat berbahaya sekali jika situs dengan konten dewasa tersebut terbuka secara tidak sengaja oleh anak sobat sendiri. Memang, tidak dapat dipungkiri bahwa situs porno tersebut sedikit banyak akan merubah mental atau watak semua orang, apalagi jika anak yang masih di bawah umurlah yang membuka situs dewasa kemudian melihat video orang mesum.
Ilustrasi anak melihat situs porno
Hmm, sobat sebagai orang tua pasti akan khawatir serta was-was ketika ponsel Android dibawa oleh anak sobat walaupun hanya sebentar saja. Takut jika tiba-tiba anak sobat secara tidak sengaja melihat konten porno dan menjadi kecanduan untuk melihat video dan foto porno secara terus menerus. Jika sobat menggunakan PC atau laptop, sobat dapat menggunakan software anti porno atau menggunakan layanan DNS gratisan yang dapat memfilter situs negatif yang teerindikasi sebagai situs dewasa seperti DNS Nawala atau Open DNS. Lantas bagaimana dengan HH ponsel atau smartphone Android?
Set DNS merupakan aplikasi Android yang dapat digunakan untuk mengganti DNS internet pada HH ponsel atau smartphone Android sobat. Sobat dapat memanfaatkan layanan ganti DNS yang ada pada aplikasi Set DNS ini. Untuk memblokir situs porno, sobat hanya perlu menggantinya menjadi DNS Nawala atau OpenDNS. Sayangnya, aplikasi pemblokir situs porno ini hanya dapat diterapkan pada ponsel atau smartphone Android yang telah diroot.
Langsung saja, berikut cara menggunakan aplikasi Set DNS untuk memblokir dan memfilter situs dewasa:

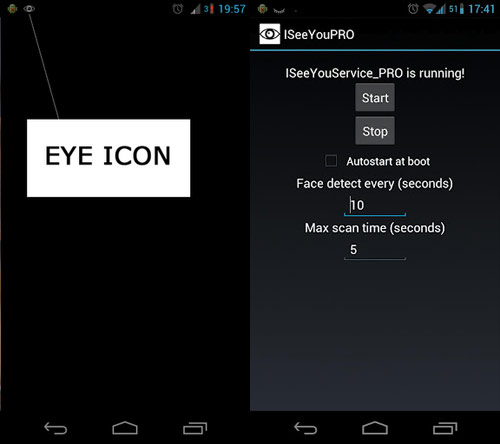
ISeeYou: Aplikasi dengan Fitur Smart Stay ala Samsung Galaxy S3


Sudahkah Anda pernah mendengar mengenai feature Smart Stay? Smart Stay merupakan feature eksklusif yang ada di smartphone terbaru Samsung, Galaxy S III. Dengan memanfaatkan kamera depan, smartphone tidak akan masuk ke mode sleep selama muka Anda ada di depan layar tersebut. Anda ingin menggunakan feature serupa tanpa menggunakan Samsung Galaxy S III? Hal tersebut saat ini sudah memungkinkan. Saat ini, sudah hadir sebuah aplikasi Android bernama ISeeYou yang memiliki fungsi sama persis dengan Smart Stay.
Pernahkah Anda mengalami kejadian seperti ini, Anda sedang membaca konten sebuah website atau e-book di smartphone. Oleh karena Anda tidak menyentuh layar atau mengoperasikan perangkat tersebut dalam durasi waktu tertentu, smartphone langsung masuk ke mode sleep. Layar smartphone Anda pun mati. Hal tersebut bisa dicegah dengan cara terus menyentuh layar, tetapi seberapa sering Anda akan melakukannya?

Senin, 24 September 2012

Tutorial Root & UnRoot Samsung Galaxy Ace Plus


Galaxy Ace Plus
The mid-range Android phone Samsung Galaxy Ace Plus S7500 get root access. Samsung Galaxy Ace Plus comes with 1GHz CPU with 512 MB RAM. It has 5 Megapixel Auto focus camera with LED Flash and powered by Android Gingerbread v2.3. Stock ROM on Galaxy Ace Plus S7500 has some limitations which don’t allow you to perform many tasks on your phone like remove junk apps, improved the performance, overclock the processor etc. You need root access to perform these task. This tutorial help you to Root & UnRoot Samsung Galaxy Ace Plus S7500.
Rooting phone will void your warranty or may cause damage to your phone. Please read the instructions carefully. Razzil will not be responsible for any damage.

Advantage of Rooting:

  • You Can remove all junky system apps that you don’t want to use.
  • You can install clockwork recovery mode(CWM)
  • You can install any ROM on your phone.
  • Improved the performance of phone.

Minggu, 23 September 2012

Cara Print Lewat Perangkat Android


Halo sobat @DroidUNJ. Cukup lama juga ya saya tidak melakukan update karena kesibukan yang lain. Pada tutorial kali ini saya akan mengajarkan cara print lewat Android dengan menggunakan Google Cloud Print. Seperti kita ketahui saat ini bisa dibilang teknologi “Cloud” sudah mulai menjadi hal yang wajar.
Hal-hal yang dibutuhkan agar perangkat handphone maupun tablet Android dapat melakukan print menggunakan Google Cloud Print adalah:
  1. Perangkat Android yang terkoneksi ke internet, bisa handphone, bisa tablet, bisa juga phablet (Phone-Tablet).
  2. Printer yang terhubung ke sebuah PC atau laptop yang terkoneksi ke internet atau bisa juga menggunakan printer yang telah “Cloud Ready” (tidak butuh komputer)
  3. Sistem operasi komputer harus Windows Vista, Windows 7 atau Windows XP SP3 (Service Pack 3).
Sebelum membaca tutorial ini ada baiknya Anda mengetahui kekurangan dan kelebihannya melakukan print Android via Cloud:
  • Keuntungan: Anda dapat melakukan print darimana saja, tidak terbatas jarak dan waktu, selama koneksi internet komputer penerima berjalan dan printernya aktif.
  • Kerugian: Untuk dapat melakukan print dokumen, gambar maupun file lainnya dibutuhkan koneksi internet.
Secara garis besar, tahap-tahap mencetak dokumen atau file via Android dibagi menjadi dua bagian, yaitu persiapan pada komputer dan persiapan pada perangkat Android.

Sabtu, 22 September 2012

Rooting Tablet Google Nexus 7 (Android Jelly Bean)


Saya tidak bertanggung jawab bila terjadi kerusakan pada device Anda.
Part 1: Unlocking Bootloader
Step 1: Download dan install Android SDK.
Step 2: Enable USB Debugging from Settings > Developer Options.
Step 3: Sambungkan Nexus 7 ke PC dengan menggunakan kabel USB lalu jalankan Terminal / Command Prompt (cmd), navigasikan ke folder di mana file fastboot dari SDK yang tadi kamu download tadi tersimpan.(misalnya pada Windows, cd C:\).
pastikan posisi terminal/cmd kamu sudah berada di folder tersebut.
Step 4: Ketik command berikut ini:

Jumat, 21 September 2012

Install Google Now di Android ICS Devices


SilentStormer:*DISCLAIMER* YOU MUST BE ON ANDROID 4.0 ICE CREAM SANDWICH FOR THIS TO WORK, DON’T TRY INSTALLING IT ON ANYTHING ELSE! *DISCLAIMER*
ROOT ROOT ROOT
Step 1: Menggunakan root file explorer, navigasikan ke /system/app dan cari file calledGoogleQuickSearchBox.apk. rubah menjadi GoogleQuickSearchBox.bak. Jadi bila terjadi apa-apa pada file yang baru nanti kita bisa tinggal merestore dari file aslinya.
Step 2: Download Velvet-theos0o-5.apk dan Rename menjadi GoogleQuickSearch.apk.
Step 3: Lalu letakan file tersebut di dalam folder /system/app. Dan rubah permissions menjadi rw-r-r.
Step 4: Restart device kamu.

(APP) Disk Digger-Recovery Foto yang Terhapus di SD Card


Aplikasi ini benar-benar gratis, dan memerlukan akses root untuk melakukan tugasnya. Saat ini dalam tahap beta, akan memulihkan gambar baru-baru ini dihapus, dan seperti aplikasi biasa, tampilan antarmuka pengguna yang seminimalis mungkin, tidak memperdaya mereka yang mendownloadnya.
Download DiskDigger for Android [Google Play link]

Firefox Browser for Android (ARMv6)


saya mau share browser Mozilla Firefox. tapi untuk nama di Android ARMv6 ini, browser itu diberi nama Fennec bukan Firefox. Fennec ini tidak berat melainkan cepat dan ringan. Fennec pun bisa menggunakan fitur Add-ons bisa diunduh di addons.mozilla.org/id/mobile/collections...aunders-/fennec-amo/
support untuk flash player juga

silakan download disini 

Bila ada masalah tulisan seperti ini dibrowsernya,
* If you receive the error “Secure Connection Failed” with error code “sec_error_no_memory”, kamu harus disable TLS support:
caranya :

1. browse to about:config
2. search for “tls”
3. toggle “security.enable_tls” to false
4. restart
 

Selasa, 18 September 2012

(APP) WifiKill- Kill Your Friend's Wifi Connection

Wifi kill ,
Dan inilah salah satu aplikasi yang fungsinya juga sangat populer pada operating system windows dan linux. WiFiKill sebuah aplikasi yang kembali dikeluarkan oleh ponury.net developer team.  secara garis besar Wifikill memiliki fungsi yang tidak jauh berbeda dengan aplikasi network controller pada windows seperti netcut, dan tuxcut pada linux family. wifikill digunakan untuk mengalihkan sambungan koneksi dari komputer korban ke gateway sehingga koneksi ke internet korban akan terputus..

mari kita lihat screenshoot nya dulu..

nah bisa dilihat sendiri sesimple apa aplikasi yang satu ini, berikut device reqruitment untuk aplikasi yang satu ini agar dapat berjalan dengan baik :

Minimum Android version: Android 2.1
Minimum screen width: 240 dpx
Requires features: Touchscreen &Wifi
Requires permissions: 
Access network state
Access wifi state
Broadcast sticky
Internet
Vibrate
Wake lock


Changelog:

v1.7 (05/11/2011) Uninstall before upgrade:
- fixed the counter bug (I hope for the last time)
- added an option to redirect HTTP traffic to specific IP (caution! this may lead to significant CPU load)
- now successful kills are tagged by green icon on the left of IP (this is not 100% correct)

Minggu, 16 September 2012

8 Aplikasi Android agar Kerja Makin Produktif


Perangkat Android, baik smartphone maupun tablet, kerap digunakan untuk mendukung aktivitas dan produktivitas sehari-hari. Baik itu aktivitas perkantoran maupun sekadar mencari informasi terkini di internet.

Ada banyak aplikasi yang membantu Anda dalam hal menyimpan data di awan. Ada pula aplikasi khusus catat-mencatat yang membantu Anda mengingat segala hal, hingga yang dapat memberi kenyamanan ketika mengetik di keyboard virtual.

Berikut ini adalah 10 aplikasi yang bisa membantu produktivitas Anda para pengguna Android.

(APP) hTC Quick Root-For ALL HTC Devices


Here is my One Click Root and UnRoot solution for ALL HTC Devices.

Note that the Insecure Boot.img method is for all devices but requires S-OFF and your Insecure Boot.img MUST have 'ro.secure' set to '0' and not use a patched adbd binary.

The Universal Exploit should work for all devices as long as you are running a FULL Stock ROM including recovery.

The Universal Exploit WILL however fail if it has been patched by HTC on the Stock ROM you are using.


Features:
  • Root Using Insecure 'Boot.img' (S-OFF Only) or Universal Exploit. (S-ON / S-OFF)
  • Option to Flash 'HBOOT' Image after Rooting, even if your device is 'S-ON'!
  • Verify MD5 Checksum of 'HBOOT' Image after backing up and after flashing.
  • Unroot Device by Patching 'adbd' binary as Insecure.
  • Root Tools to Clear Battery Stats and Dalvik Cache.
  • Reboot device to any mode after Rooting.
  • Execute Reboot commands independantly.
  • Thorough Error Checking and Stable ADB Framework implementation.
  • Includes BusyBox v1.20.2 and SuperSU v0.96
Quote:

(MOD) Geeky Engine-Boosting Your Android Engine

Geeky Engine is a Script package By Forever King ..It Contains New Features and Iprovements!! And its much much better then some engines.


What can Geeky Engine do ?


Can make your phone 
FROM 


TO

Features


Some xbin tweaks
Many init.d tweaks
Many ddefault.prop tweaks
VM Tweaks
SD card tweak
Better Battery Life through Battery Tweaks
Reduced /dbdata, /data, /sdcard usage of *.db files and faster database access. | World first smart sqlite optimizing
Increase touchscreen sensitivity
much of prop tweaks

Sabtu, 15 September 2012

[APP] Front Camera Mirror

Major Update! Supported on all 4.0+ devices now! Nexus7 Mirror is now Front Camera Mirror!

It's official, my first release on the Google Play Store.

Nexus7 Mirror

Posted Image

ScreenShots:

Posted ImagePosted Image

Posted Image 

[MOD][UNIVERSAL] Modified DSP Manager with BEATS audio. For CM9 & AOKP.(6.25.12)


Posted Image

Posted ImagePosted ImagePosted Image

I have Modded DSPManager to use the libs & Audio files from BEATS to work with AOKP & CM9 ONLY!!!


Flashing this will not mess up your other Equalizers!!


V.1
Had a bunch of FC for alot of devices 

v.2 
Fixed the FC issue

v.3
Added MUSICFX so settings work for CM9
Added Awesome Control Panel
Re-built Awesome BEATS

Download: AwesomeBEATS™ v.3
Just FLASH and enjoy!! 

Make sure to change in SETTINGS/SOUND/MUSIC EFFECTS to AWESOME BEATS.
Thanks to:

spc_hicks09 (with Permission to use his modded DSP manager)
Sckyboy78 (For the find )
nik3r (For all the help getting it to work on other devices)
mwalt2 (Helping fix the MOD to work on CM9 based Roms)

Confirmed Devices working:
MyTouch 4G
Desire HD
Desire S
Inspire 4G
Desire
GalaxyTab Plus
Sensation
Amaze 4G
Galaxy S2
Nexus
SSII
SI
Sensation XL

MAKE SURE YOU GUYS HIT THAT THANK BUTTON IF THIS MOD WORKED FOR YOU!!!

Flashing Custom ROM Android Jelly Bean 4.1 Untuk Samsung Galaxy Tab P1000


Belum lama Google mengeluarkan versi android terbarunya yaitu Jelly Bean atau android versi 4.1.1 dengan ditandai launchingnya Galaxy Nexus 7,
Para Anggota CyanogenMod telah berhasil memporting ke beberapa device Android.
cdesai & THE TE4M developer xda yang concern ke galaxy tab (utamanya P1000) telah berhasil memporting CyanogenMod 10 (CM10) Jelly Bean ke Gtab P1000 (dan P1000N/L).
Jika  ingin mencoba mencicipi CM10 Jelly Bean, silahkan ikuti tutorial berikut.

DO IT WITH YOUR OWN RISK !
  • Masih PreAlpha
  • Masih banyak Bug/Error

STEP A1

  • Backup Seluruh Data ( Aplikasi,Sms,Kontak dll..)
  • Disarankan menggunakan Titanium Backup Pro ( Rooted Only )
  • Jika Perlu Lakukan Nandroid Backup

STEP A2 ( Installing Stock Safe ROM )

  • Buka Odin, Tekan tombol Power+Vol Down pada Gtab secara bersamaan
  • Saat masuk " Download Mode " , Pilih file PIT = gt_p1000_mr.pit
  • Pilih PDA pilih "GB Stock Safe V5" / Gingerbread.XXJQI ( Pastikan Re-Partition Diceklist)
  • Pilih Phone lalu masukan file modem.bin ( Asia = JPZ )
  • Klik Start, Proses akan memakan waktu 2-3 Menit, tunggu sampai ada bacaan " PASS " bukan "FAIL"
Tampilan Odin + File


STEP B ( Installing CWM "ClockWordMod Recovery" )

  • Masuk lagi ke download mode " Power+Vol Down "
  • Buka Odin lalu pilih PDA, Cari file " Overcome_Kernel_v4.0.0.tar "
  • Lalu klik Start, Gtab akan Reboot, tunggu hingga ada tulisan " PASS "